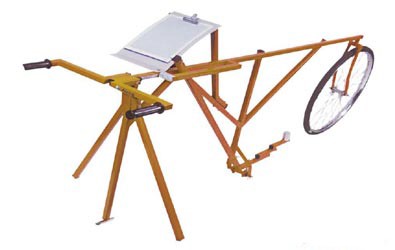
Merlin Test Apparatus
- home
- Civil Engineering
- Bitumin & Asphalt Testing Eqipment
- Merlin Test Apparatus
Merlin Test Apparatus
Short Discription :
The MERLIN (Machine for Evaluating Roughness using Low-cost Instrumentation) is a simple, cost-effective device designed to measure road surface roughness, which is critical for assessing road conditions and vehicle operating costs. Below, I address your queries about its features and provide a detailed explanation of its operation based on the provided information
Standard Following :
ASTM D4253, D4254. IS 2720 (Part 14)
Brochure:

Principle Of Operation
MERLIN consists of a 1.8-meter-long metal frame with a wheel at the front and a metal foot at the rear, with handles above the rear foot for easy movement. A probe, positioned midway between the wheel and foot, is attached to a weighted arm that keeps it in contact with the road surface. The arm is pivoted near the probe, amplifying vertical displacement: a 1 mm vertical movement of the probe translates to a 1 cm movement of a pointer at the other end of the arm. This pointer moves across a chart with 5 mm wide columns, providing a visual record of the probe’s position relative to an imaginary line connecting the wheel and foot.
By recording the pointer’s position at multiple points along a road, the spread of readings indicates the road’s roughness. A greater spread corresponds to a rougher road surface, and this spread has been shown to correlate well with standard roughness scales, ensuring reliable measurements.
- Easy to use: MERLIN is user-friendly, requiring minimal training. It can be used for direct roughness measurement or to calibrate other instruments like the Vehicle Mounted Bump Integrator, making it versatile and accessible.
- Self-calibrating: The device is designed to be self-calibrating, eliminating the need for frequent external calibration, unlike many other complex instruments, which simplifies its operation.
- Robust: Constructed with a sturdy 1.8-meter metal frame and readily available components, MERLIN is durable and capable of withstanding field conditions.
- Easily maintained: Its simple design and use of common, readily available components make maintenance straightforward and cost-effective.
- No complex calculations: MERLIN’s operation does not involve intricate calculations. The roughness is indicated by the spread of pointer positions on a chart with 5 mm wide columns, providing a simple, visual representation of road unevenness.
- Measures displacement to less than a millimeter: The device is highly precise, with a probe that measures vertical displacement to less than a millimeter. The arm’s pivot amplifies this displacement, so a 1 mm vertical movement of the probe results in a 1 cm movement of the pointer, ensuring accurate readings.
Nothing To Show
Nothing To Show
